 Watch to see how (3:43).
NOTE: For descriptions of the fields in this procedure, see Smart Integration Connector Terms.
To create a Gateway Connection :
-
Go to System > Administration > Smart Integration Connector.
-
Click
 Create New Connection.
 -
Enter the Name and Description.
NOTE: The Connection name cannot be changed once created and must be deleted and re-created.
-
Select the Gateway Server from the drop-down, or enter a new Gateway Server name in the same field. If this is the first Connection being created, enter the name of the Gateway Server.
NOTE: It is common practice to use the hostname or IP of your Smart Integration Connector Local Gateway Server as the "Gateway Server" name. The Gateway Server name is only used to organize servers when multiple Smart Integration Connector servers are set up.
-
From Connection Type, select Gateway Connection.
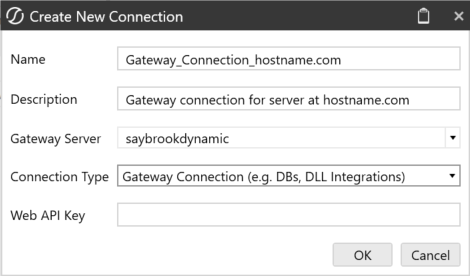
NOTE: Each Gateway Server will only need one Gateway Connection and as such we recommend naming it "Gateway_Connection_" followed by the name used for "Gateway Server." This will differentiate the Gateway Connections in future steps.
-
The Web API Key is used as an additional layer of security when communicating with the Smart Integration Connector Local Gateway Server internal APIs.
NOTE: WebAPI keys are not required, but are best practice to enhance security and can be modified or added at any time. The Local Gateway Service introduces a WebAPI exposed only to OneStream and bound only to localhost on the server it is deployed to. This WebAPI is inaccessible on the remote network. If the Local Gateway Service is bound to other network interfaces, it is suggested to use the WebAPI as a mechanism to enhance security on the remote network preventing unauthorized use of OneStream WebAPIs.
-
Copy the configuration to the Smart Integration Connector Local Gateway Server using the OneStream Local Gateway Configuration application. For details, see Export and Import the Connection Configuration.


